Gauge Blocks (Detailed)

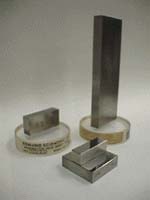
Fig. 1 Gauge blocks.
Gauge blocks are simple, but very accurate and practical. Therefore, gauge blocks are widely used such as calibrations and testing of micrometers, calipers, and coodinate measurement machines. We at NMIJ calibrate gauge blocks by optical interferometry with small uncertainty.
Range: Nominal Length of 0.5 mm~250 mm
For simplified version of uncertainties and conditions, please access page of detailed presentation.
| Expanded Uncertainty(k=2) | Measurement Conditions | Accreditation |
|---|---|---|
| √((23 nm)2+(0.10×10⁻⁶
L)2) |
ASNITE, KCDB (New window will open.) |
Range: Nominal Length of 150 mm~1000 mm
For simplified version of uncertainties and conditions, please access page of detailed presentation.
| Expanded Uncertainty(k=2) | Measurement Conditions | Accreditation |
|---|---|---|
| √((20 nm)2+(0.17×10⁻⁶
L)2) |
Material : Any but low thermal expansion coefficient | ASNITE, KCDB (New window will open.) |
| √((28 nm)2+(56×10-9
L)2) |
Material : Low thermal expansion coefficient material | ASNITE, KCDB (New window will open.) |
Range: Nominal Length of 0.5 mm~100 mm
For simplified version of uncertainties and conditions, please access page of detailed presentation.
| Expanded Uncertainty(k=2) | Measurement Conditions | Accreditation |
|---|---|---|
| √((14 nm)2+(0.23×10⁻⁶
L)2) |
Already wrung onto a platen Thermal expansion coefficient of(11.5±1)×10-6 /K (Ex. Steel), standard uncertainty of less than 0.3×l0-6/K, or (9.3±0.5)×10-6/K (Ex. Ceramics), standard uncertainty of less than 0.3×10⁻⁶/K |
|
| √((14 nm)2+(64×10-9
L)2) |
Already wrung onto a platen Thermal expansion coefficient of(0±0.5)×10-6 /K (Low thermal expansion coefficient material), standard uncertainty of less than 0.1×l0-6/K |
Calibration Technology

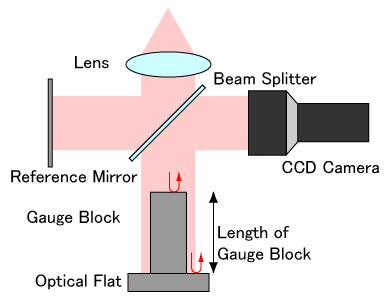
Fig.2 Schematic of gauge block interferometer.

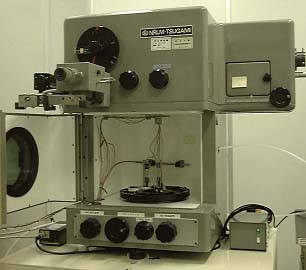
Fig.3 Picture of gauge block interferometer at AIST.
The precise calibration of gauge blocks are conducted by optical interferometery. The gauge block is wrung on an optical flat in the case of interferometric calibration. The distance between the top surface of the gauge block and top surface of the optical flat can be considered as the length of the gauge block. The structure of the gauge block interferometer is shown in Fig. 2. The optical path difference between the lights reflected at the top surfaces of the gauge block and the optical flat is measured by interferometry.
The gauge block interferometer at AIST is shown in Fig. 3. It was designed and manufactured by collaboration between NRLM (former AIST) and Japanese manufacturer of machine tools. We upgrade this interferometer to use it with laser light sources, CCD cameras, and precise temperature controllers.
Calibration Authority
HORI YasuakiInternational Comparison Participated
| Comparison ID | Type | Time | Transfer devices | KCDB (New window will open.) |
|---|---|---|---|---|
| CCL-K1 | CIPM key comparison | 1998-1999 | Steel (0.5 mm-100 mm), Tungsten Carbide (0.5 mm-100 mm) |
CCL-K1 |
| CCL-K2 | CIPM key comparison | 1999-2001 | Steel (175 mm-900 mm) | CCL-K2 |
| APMP.L-K2 | APMP key comparison | 2000-2002 | Steel (200 mm-500 mm) | APMP.L-K2 |
| APMP.L-K1 | APMP key comparison | 2001-2002 | Steel (0.5 mm-100 mm), Ceramics (0.5 mm-100 mm) |
APMP.L-K1 |
| APMP.L-K1.1 | APMP key comparison | 2005-2006 | Steel (0.5 mm-100 mm) | APMP.L-K1.1 |
| APMP.L-K1.1.2011 | APMP key comparison | 2011-2012 | Steel (0.5 mm-100 mm) | APMP.L-K1.1.2011 |
| CCL-K1.2011 | CIPM key comparison | 2011- | Steel (0.5 mm-500 mm), Ceramics (3 mm-90 mm) |
CCL-K1.2011 |
| APMP.L-K1.2018 | APMP key comparison | 2020- | Steel (0.5 mm-500 mm), Tungsten Carbide (0.5 mm-100 mm) |
APMP.L-K1.2018 |
Mascot

Fig. 4 Mascots of gauge blocks.
Left: Gejita, Right: Gejio.
They are mascots of gauge block group.